Okay after a long break due to work loads it is finally the start of experiment day Sunday This first experiment will actually be a two part thing. There are a few projects I want to make a tough transparent & sometimes a translucent skin for this two part experiment will give me all the data I need to know in advance for the other projects I have in mind. Ordinarily these Sunday. experiments will only consist of a single part. This first in many such Sunday experiments as I have already stated is to gather data for several projects.
In the first part of this experiment I am going to attempt to make two translucent dragon wings. The dragon is to be part of another project I have in mind. I will discuss ‘that’ in more detail another time what’s important here are the wings themselves. Initially the wings are of a simple design I have already created (see my YouTube video listing at the bottom of this blog for full building instructions) the only difference being in the ‘skin’ of the wing itself between the wing fingers.
Now to try & create this translucent skin I am going to use cling film or shrink wrap as it is sometimes called. How many actual layers it is going to take will in future is yet to be determined by the final wing size(s) so for now I am speculating around 6 layers for these particular wings which are by most sculpture sizes medium to large, but the final amount of layers may have to be increased later.
Each wing will be built from ‘both sides’ at once. By that I mean if I use 6 layers in all the 3 layers will be added to one side then 3 layers to the other side. To merge each layer & give overall strength I am going to coat each new layer of wing skin in clear varnish. Pure undiluted PVA glue would work just as well but PVA tends to turn milky when the amount is used in close unison such as I am about to attempt here. I should also point out that there are many different brands of varnish that will give different results, but I am using: RONSEAL ULTRA TOUGH HARDGLAZE. For the first initial coats I will be using varnish with a thin coating of water based pre-mixed paints. As I get closer to the final layers required I shall then be adding the vein details using CD pen permanent markers to draw in the tiny vein details. All this will be sealed within a final layer of cling film & varnish.
In the normal construction method for this wing design I would use two layers of basic type brown wrapping paper (waxed on one side & plain paper on the other) sealed with undiluted PVA glue. This gives that type of wing creation some flexibility when the wing is caught in a draught if some what stiff movement. I am hoping this NEW translucent wing design may have some if not all the same qualities.
Here is an example of the crude paper mache ‘test’ wings I will be using for this experiment:
A close up of the painted on skin texture:

RESULTS:
Will be listed next Sunday
EXPERIMENT PART 2:
In this second part of this experiment I shall be attempting to make again translucent but hollow crystals। Again like the dragon wings these crystals are for another future project. By chance they are for the same project as the dragon wings. The reason I am going to use the same method to make the crystals comes about because I want to be able to make hollow (light weight) crystals to order, to any size & to be able to allow a back light to show through them. Like the dragon wings they will be coloured (tinted) to the required final colour(s) when complete. Many of the same methods used to create the final translucent dragons wings will be used here. The only real difference with be a paper mache mould to create the final form (shape) of the crystals that I plan to make.
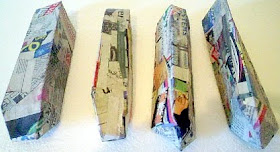
Here are some examples of the crude paper mache ‘test’ crystals I will be using for this experiment:
RESULTS:
Will be listed next Sunday
You can see this full experiment in they’re OWN HOW TO video’s on YouTUbe. The video links WILL be added to my YouTube listing at the bottom of this blog the moment I have it uploaded.


No comments:
Post a Comment