Hi all, i started this blog because there are a LOT of creative minds out there in the world & a lot of you HAVE the skills to do something with that creativity through paper mache. Of course there ARE just as many who do so already but who perhaps need some additional inperation to help grasp some NEW ways of seeing this art mediums potential. That is what i created this blog for, not so much to show off MY creativity I am after all not the worlds greatest artist. I how ever DO like to think i can help people see more potential with this art form.
I welcome your visits be you an exsisting world recognised paper mache artist, mixed media artist or even another type of media artist, or just someone totally new to this art form experimenting who may not even use paper mache at all in your current art. I freely give links back to your blogs, websites & even forums. Some more than once through out my blog here if you ask me to or not. How ever i ask only one thing. Your links MUST be to some form of artistic related site ONLY if not as mine is but at least similar in form!.
On two occasions now i have had a visitor posting a comment but also included a link to NONE art related material. The site being linked back to in MY opinion IS nothing more than a spamming site that the owner IS using to seek financial gain for themselves by advertising none art related subject material for commercial related sponcorships. This IS intolerable bahaviour. Whilst i do not mind the occaisional 'friendly' but 'brief' none art related disscusion. ALL comment posting MUST retain 'some' if not total connection to art be it paper mache or mixed media paper mache related if only then as YOU are such a person.
When i first began this blog i had the comment setting at 'moderated' i have since then given my visitors a level of trust that i hoped would NOT be violated. Saddly one person so far has done just that!. I do not wish to restore my settings back to being moderated, but i WILL if such intolerable violations persist!. I AM extremly busy, married with children (mostly all grown up now) so i have a life beyond the bounderies of the internet that comes with ALL the pleasures & torments life likes to throw at us all & THAT life IS often a busy one on it's own. Yet i devote a LOT of my 'personal' time & energy into making this blog as well as HOW TO video's on YouTube for both the exsisting artistic mixed media comunity & those wishing to simply experiment or explore this art form.
I do NOT have the time to waste on constantly moderating comments that 'should', 'could' simply be freely allowed to be posted here. I AM using my time & knowledge to give knowledge & save people time. PLEASE show me the SAME respect. When commenting keep it art related ONLY if & when possible!.
I appologise to those of you who this matter does not relate to it was not YOUR fault that you had to read through this ranting. I repeat to those to who'm it DOE'S concern - If your comment is none art related or contains elements that are NONE art related as specified above, then JUST DON'T LEAVE IT HERE IT IS NOT WELCOME!.


Friday, 29 January 2010
Thursday, 28 January 2010
COPYING USING FOIL - PART 1
As with many things in life you will find there IS more than one way to do the same task. Obviously quite often the newest way tends to be the best, however which ever way suites YOU is the best in my opinion. I find this rule especially follows in reproductive art such as i am about to show you.
If all you require is a simple basic copy of something, in this case a human skull i have found the fastest & cheapest method is to do so is in foil & masking tape. Remember my paper mache art is based around recycling as many paper & cardstock materials as possible & for artists who may be working on a tight budget. Of course having a large family means we produce a LOT of paper & cardstock waste so for ME this is the main driving force behind how & why i do things the way i do too.
Latex & plaster mold copying IS the best undeniably when it comes to copying subjects in high detail. For MY skulls how ever i simply need to copy a 'rough' skull form which i can then add the defining details to later in minutes. Also because of HOW i intend to finish off each the project using these skulls i don't require ALL the finer details such as cranium cracks & finer tooth shapes etc so the method i am about to show you will make sense later when you see what i make with them.
Start with a simple stripped down skull minus the small thin bone running along side the cheek & the small section at each side of the template.

When it comes to life like art ie: my skulls i normally try to work to one third true scale but these skulls are around half true scale. As you can see to make copying easier i have only created a 'basic' stripped down skull form. HOW YOU do the following steps is entirely up to YOU.

Begin with a small piece of foil that is slightly 'wider' than the skull. Then tack it in place.

Place a strip of masking tape across an eye socket then 'push' it into the socket & hold it there.

Whilst holding the first piece of tape 'in' the eye socket tape around the socket with smaller pieces of tape. Include up the side of the nose cavity too if you have one there. In doing this you will force the foil to retain that shape.

Whilst holding a finger 'in' the 'first' eye socket repeat the proceedure for the second eye.

At this point you can add a small piece of foil to the forehead too if you like.

Now cover the lower face with foil & tape over. At ALL times pull the tape 'tight' & rub it down 'hard' to keep as much of the skull shape as you go. Any small holes or tears you create can easily be repaired with a small piece of tape.

You do not need to cover the entire skull with tape as i have here, but i did so to show you can if you want to, some people like to be thorough like this. In reality you ONLY need add tape to seal the edges of the foil pieces & to hold the shape of the face of the skull. Now cover in paper strips & leave to dry FULLY.
ADDITIONAL:
IF you plan to cover your skull(s) with Dragon Skin or some other hard coating you need ONLY cover the skull in 2 layers of news print & 1 layer of standard A4 white printer paper. As in 1 layer of news print then 1 layer of white printer paper, then finally a layer of news print again to finish. IF you simply plan to paint the finished copy then you WILL need to go a little thicker with the paper copy. Do not forget how ever you have to cut this copy free. If you make the copy too thick with paper then cutting it WILL be MORE difficult.
A VISITORS QUESTION - WHAT IS DRAGON SKINNING?
A recent visitor/reader just asked me this question. Although i have described 'Dragon Skin' before i will do so again.
Basically about 4 years ago now when i got back into paper mache the first thing i wanted to do was make dragons. More specifically back then just large wall mounted dragon heads. Having 6 children now mostly all grown i KNOW the last thing you want free hanging on a wall is something that can fall & be heavy enough to cause serious injury. Ordinarily paper mache doe's not need to be several inches thick to be strong. It is by it's very nature a light weight material that becomes lighter over the years as it continues to dry out. How ever i wanted MY art to be even lighter still from the start.
So after applying a little knowledge of certain materials both easily purchased cheaply as well as already available around the house along with wanting to make my art on a 'shoe string budget' basis for artists who may be doing art with limited funds. I came up with a flour, water & PVA glue mix that i used to cover as few as 6 to 8 layers of paper mache (news print) that was as strong as most any 15/20 layers of paper combinations. Not knowing anyone else having done this at the time & needing a way to describe it, because i created this mix for my 'then' large dragon heads i simply named the mix 'Dragon Skin'. Now i apply it to anything paper mache that i want to make as strong & as light as possible using as little paper as possible. Naturally on doing so i then coined the phrase "Dragon Skinning".
ie: I will NOW be 'Dragon Skinning' this skull to give it a smooth & bone hard finish that reduces the need to sand it before painting.
I have since then perfected a way to 'grow' texture (YES GROW as it dries grow) in the dragon skin with a result that is something akin to toad skin. NO THAT recipe IS secret & will NOT be revealed here!. As well as make Dragon Skin so when dry it is as hard & smooth as to ressemble bone. ie: My 'bone mix Dragon Skin.
You can learn how to make Dragon Skin right here with my YouTube HOW TO video:
http://www.youtube.com/watch?v=AFhUEVQDs1M
GETTING BEHIND OR IN FACT 'AHEAD' OF MYSELF - UPDATE
I now have 6 slightly different skulls to start copying my 70/100 skulls from whilst i finish my daughters dolphin money bank birthday project.
In my HOW TO make a human skull video on YouTube i state that the best way to copy a tricky shaped object, in this case a human skull. It is best to simply copy the face section then add the head section with a balloon. How ever it IS possible to copy tricky objects such as a WHOLE human skull as i will be doing here with these.
It involves some foil, masking tape & a steady hand with a 'sharp' craft knife. Once i get to copying these i will post how i do it for you all. For now here are my 6 master skulls. Note these skulls are missing a few important details besides the jaw, but i will explain this better in a few days.

A fellow paper mache artist & friend of mine Kent Goodwin has taken Dan Reeders 'paper ball method' & combined it with MY copying method & modyfied it (no foil) & is now using the technique to make some great looking dragon heads with it. He has some brilliant step by step tutorials on his website one of which IS how he made a dragon head whilst making a blank head to copy from to make as many more as he likes. He will soon be doing a video on this process too.
Another artist colleague of mine Stolloween has some fantastic skulls & skeleton tutorials on his blog too. Just scroll down about a 3rd of the way on his picture index links to find them.
Tuesday, 26 January 2010
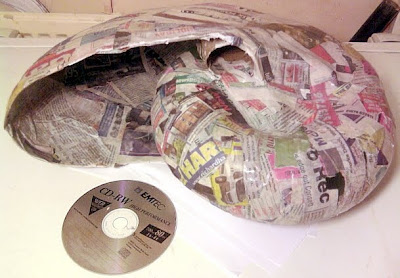
ANOTHER OLD PROJECT I JUST FOUND IN MY WIP BOX
Here is another old project i just found in my WIP box about 20 minutes ago. I forgot i was doing this one. i started it around the same time i was doing some giant Queen Conch shells. I think i might get back to work on this the minute i finish this dolphin money bank along with the Queen Conch shells too.

GETTING BEHIND OR IN FACT 'AHEAD' OF MYSELF
In all the places i hang out i have talked many times of 'old projects' that i have unfinished or am yet to start. Often i have blamed space as being the cause for this er!, delay. Since i have had a bit of tidy up i can not use that excuse anymore lol. So the other day whilst starting a project for my youngest daughter for her birthday i decided it was time i got to doing some of the older projects i have been putting off as the stages of the birthday project was off drying.
Amongst some of my unfinished projects that i have been putting off countless times many feature human skulls. A 'lot' of skulls in fact i need somewhere between 70 to 100 skulls for all the planned projects. Naturally i have been putting making them off who wouldn't thats a LOT of skulls lol. Amongst those skull related projects are a couple of new grim reapers (see FINISHED PROJECTS down the right hand column) of course but the other projects vary in size & shape. The largest project amongst these will take around 40/60 skulls alone (which will include half & partial skulls too) in it's creation whilst others will take between 4 to 20 skulls each.

The three & a half skulls shown here will be used to create copies of all the skulls i need. Naturally ANY of the projects i have planned would look 'odd' if all the skulls were 'identical' so as i copy from the shown skulls i will make 'deliberate' changes, adjustments to phrase it better to each new skull i make. a missing nose here, slightly more prominant eye ridges there. A half skull here etc.
I have Dragon Skinned these to make them stronger since i will be cutting the copies from them i want them to last long enough during the copying/cutting process. The copied skulls will only be around 4 layers of news print & A4 80gsm white printer paper thick each. But again each once used in it's own respective project will be finished in Dragon Skin to both make it/them harder & a little fire resistant. More on the copying & the projects soon as i do each project over the following months i WILL post them here too.
Monday, 25 January 2010
BUSY RIGHT NOW SO JUST A QUICK POST
Hi everyone, just stopped in to say i AM working on the dolphin money bank as you are reading this. I haven't suddenly taken ill, or given up on my blog here. Not quite yet anyway lol. How ever because this is also a part of a present for my youngest daughters up & coming 16th birthday it's obviously a little special. I don't have time to keep stopping so far through the project to edit video, take still pictures & edit posts for the blog here like i normally would.
I want to work straight through on this one to get it done well in time (for once) so if i need to experiment with something or adjust something along the way i will have time to do it. How many of you have made something & after you have finished thought to yourselve's "Oh God i wish i had just done that there now. Awe never mind since no one can see what i 'meant to do' they will think it's meant to look that way now. It would have looked so much better though!".
I AM video'ing the project as it is being made & WILL get to sorting out the pics etc for the blog here the minute it's finished. Just a couple of more days i promise you guys okay. Okay be back here soon lol.
Sunday, 17 January 2010
SO WHATS NEXT THEN?
Well i have to get on with some unfinished projects. I did a big tidy up over the Christmas & New Year holiday break but i still have a lot of unfinished projects cluttering up my limited work space.
Do you remember my Dolphin water feature i started a little while back? Well my youngest daughter (now 15 years old) asked me to make a money bank for her from one of those dolphins. Thats one of my unfinished projects. I am going to modify part of my dolphin water feature so that the money bank has a dolphin sat on a cresting wave. Just like on my water feature. For the money bank how ever i am going to simply make the cresting wave larger to accomodate the cash.
I have started to paint one of my dolphins from my water feature with a dragon skin 'bone mix' which should be dried tomorrow at which point i can start to create the wave for it. I guess this is as good a project to show you next.
So for now i am going to go finish this YouTube video 'HOW TO' for my 3D moon & stars mobile. Then tomorrow i will start this dolphin money bank project to show you all. Until then enjoy the posts here so far & i will be back tomorrow.
3D MOON & STARS MOBILE - FINALLY FINISHED
I finally have this project finished. I am however going to re-do the smaller 4 pointed stars as 5 pointed stars they not only look wrong (i think anyway) but they are a little 'squished' in shape compared to the larger stars i made. I can't find my little collection of hooks i bought so can't show the other stars in this short video. they are supposed to be hung from the ceiling around the moon at alternate heights, so i am afraid your going to have to imagine them there sorry lol.
The poor lighting does not show of the stars 'shimmering' very well (you CAN see this better in the YouTube video when i get it done later today) especially in this smaller window. Anway here is (Harvey) my 3D moon & stars mobile finished.
The poor lighting does not show of the stars 'shimmering' very well (you CAN see this better in the YouTube video when i get it done later today) especially in this smaller window. Anway here is (Harvey) my 3D moon & stars mobile finished.
Friday, 15 January 2010
3D MOON & STARS MOBILE - UPDATE FIXING THE STARS HOW STUPID AM I?
So earlier today i set about fixing the overzealous rushed & botched varnish job i made on the stars the other day. When it occured to me i don't have to re-cover each star with tissue & then paint, re-varnish & glitter them. Well not entirely anyway!.
All i need to is to re-paint the area's where the varnish runs are, DOH! am i an idiot or what lol. Er!, there is no need for responces there folks that was a retorical question lol. So today i re-painted the varnish run areas & tomorrow will be re-varnishing then & adding the glitter again. This time of course i WILL be taking my time about it. Trying to rush a project no matter how large or small will get me or anyone else no where in a hurry a lesson i know only too well. I guess i desserved the extra repair work for being so stupid in the first place lol.

This is the worst effected star with the varnish that ran over the back. Mercifully the rest were not this bad & most of them were only at the time finished on one side. So the damage was minimal in the end it just looked worse than it really was i suppose.
TRICKS & TIPS No. 4

So you have just created the perfect monster, creature or dragon etc. The best paint in my mind for realistic leathery skin is latex based house paints. Problem you do not have any laying around. Okay no problem if you have some MATT, SILK or other water based paints. Either cheap child craft paints or some you bought yourself then simply mix in some undiluted PVA glue.
I can't give you exact proportions for this as each project will be of a different size & therefore require different amounts of paint, BUT!, the proceedure IS simple anyway. Pour out or mix up (when making your own colours) roughly 'half' of the amount of paint you think/know you require. YES i said HALF of what you think you are going to require. Now add around a third as much UNDILUTED PVA glue to that & mix well. Most PVA or white glues are clear when dry so the final colours of your home made latex paints will not change when dry. IF you are using a PVA paint that remains white when dry then you may need to add slightly more colour to get the final colour you want.
ADDITIONAL TIP:
Mix the home made latex paint(s) in a container you can seal. Paint a small amount on either the project or a similar surface & allow to fully dry. This will help to determin the final dry colour & the quality of the latex paint when dry. If you are wearing rubber gloves or better still don't mind paint on your hands paint a small amount on your fingers. Peel it off when dry to determin the mix better.
Thursday, 14 January 2010
3D MOON & STARS - A BETTER LOOK AT HARVEY
Whilst i am sorting out the stars for this project (i have had problems with the stars i will tell you more in a minute about that). I thought you might like to have a better look at Harvey so far. Sorry about the poor lighting. The day light is poor & sadly the UK goverment is having a big 'lets pretend to be doing something for the enviroment' & has banned all normal decent size/power light bulbs. We can only buy lower wattage enviromentally friendly bulbs these days of which the MAX wattage is 70Watts, & they are totally rubbish. I can no longer read in the living room now as these bulbs are so low. Oops rambling aren't i?
Here is a quick look at Harvey without his stars for now. I varnished him once the paint was dry but forgot to take into account the varnish would darken the paint so he IS a little darker than i originally intended but he still looks fairly okay.
Here is a quick look at Harvey without his stars for now. I varnished him once the paint was dry but forgot to take into account the varnish would darken the paint so he IS a little darker than i originally intended but he still looks fairly okay.
Wednesday, 13 January 2010
3D MOON & STARS MOBILE UPDATE - KIND OF
Have you ever worked on a project you came to regret slightly? I have today with my 3D moon & stars project lol. My next art supply run is not until next week (Tuesday if i have my weeks right) until then i am out of rubber gloves. I rarely use them they get in the way especially with PVA glue. This project WAS supposed to be 'quick project' that got finished just before Christmas but the holiday period caught up on me. i want to get back on with other unfinished projects so am putting the final touches to this one ahead of the next supply run.
This is the point where 'i wish i hadn't'. I varnished the moon yesterday & it has dried nicely along with what now look like milk weed stains on my hands where i thought i had scrubbed off all the varnish but hadn't. Today i am varnishing the stars & adding 3 colours of glitter to them. Take my word of advise on this don't do it without gloves. No matter how much gloves make life 'tricky' when sculpting - use them lol. I now have milk weed stained & glitter covered hands!. It is going to take days to scrub this lot off lol. I just hope i can get it all off BEFORE my art supply run or i just know i am going to get some strange looks lol.
Apart from this er!, sticky hand related hitch the project should be completed tomorrow & i should have the final video complete with the project shot & uploaded tomorrow or the day after.
Sunday, 10 January 2010
A BLAST FROM THE PAST - FROM PAPER AIRPLANES TO... PAPER AIRPLANES!
Who hasn't folded a sheet of paper & made paper airplanes? For me it started in first school (kindergarten). At play times (recreation breaks) we'd steal a fist full each of those rough blue paper hand towels from the dispensers then scoot out into the yard. Within minutes the sky around the yard would be filled with blue paper airplanes of many shapes & sizes. I remember everytime we threw them we'd know we would not get them back & would have to begin making more that instant the planes left our hands. It was great fun while it lasted. Of course those of us who made the best fliers would be conscripted into making them for everyone else. Then of course the more we made the more our fun drew to a faster end. It got so bad that the toilets were never re-stocked fast enough to replace the missing paper towels lol.
Buy the time i was around 8 years old my facination with flight (space too) had grown even stronger. We lived (back then) near some local farmers fields which backed onto an old brick 'clay' supply area. Basically some giant pits left over from an old brick making yard a few miles over in the opposite direction. Of course by the time i was old enough to be wandering into such area's they giant pits had long since half filled with water & become miniture wildlife area's. One was named the big pond another the local swimming hole was called the 'dolphin pond', the 'little pond' etc.
The 'clay hole' we called the collection of massive ponds. Anyway. By the time i was 10/12 years old the land was sold off & became a rubbish tip. Yes you guesed it (those who tried anyway) we called it the 'tip'... We'd often roam over there to see what goodies we could root out. Ah the paint fights & other boyhood fun we'd have lol. MY main goal was ply wood. I'd troop back with arm fulls of the stuff some days lol. Once i got the stuff home i'd cut it up & make airplanes from anything with 2 feet wing spans to 4 feet. There was an open patch of ground we called 'the green' that was used for everything from rounders (base ball) to football (soccer) to giant bonfires on Guy Forks nights (Nov 5th) catapult (sling shot) fights & more lol. That all ended when someone brought an air rifle to one games of armies one day, but i digress a little here.
So as my airplanes were getting bigger getting plywood big enough or carrying it was becoming a real problem so i chose the ONLY option open to me i scaled down the airplanes to around 2 feet in wing span. Of course THEN it became the school break time all over again people would turn up with wood for me to make airplanes for them. In then end I was making a little spending money out of it. Of course they didn't always bring the right kind of wood & the planes i made for them never lasted more than a day or two. Then i got the brilliant idea of attaching a length of nylon fishing lines to one wing of the planes. The idea being you stood in one spot & slowly let the line out as you spun the airplane around your head. They only flew in circles but they flew & lasted longer too.
As more people wanted them the supplies of the right wood like the paper towels at school came to an end. I simply switched to stunt kites after that lol. My first real stunt kite was a huge blue 'Peter Powel' stunt kite (http://sweetswheniwasakid.com/1970s.aspx scroll down about half a page to see an example on left of screen). Sadly many local fools would come into the school yard & grab at the tails of my then expensive kites. I would then ahem!, quite naturally dive bomb them. I broke my Peter Powel kites spine twice before i gave up trying to repair it anymore.
So enough rambling about my childhood (some of the good times) & back to the point of this post. A while back i was wondering if i still had the airplane building skills i once had. Can i build an airplane or two that can take a small working model airplane motor & fly? Of course this would not be a fully functioning acrobatic model. It WOULD just be a stake in the ground with a fixed cord on the wing to keep the airplane flying in fixed circles, nothing fancy. I know how to make paper mache as thin as 1mm & NOT warp & still be as strong as several layers of PM. But, can i make some single wing custom airplanes that fly from PM?
I might just take that challange up one day in the near future. For now though i am wandering IS there anyone, any place where people ARE doing this right now? Are there any websites, blogs, group etc where i can find this information to see whats occuring in this field? I am NOT talking about wooden, plastic or even fibre glass etc airplane modelling & flying here remember. I am talking about paper mache'd airplanes that fly. I Am going to have to take the plunge & do some research on this one soon for sure even if it is just a pointless go nowhere curiousity filling research trip lol.
In the meantime anyone know of anythng going on anywhere? Remember 'flying' ACTUAL paper mache airplane models.
Saturday, 9 January 2010
3D MOON & STARS MOBILE PART 6 THE FINAL PART
Now i have the moon finally finished i can get the stars finished too & hang the project. For MY 3D moon & stars project i made 2 large, 2 medium & 6 small stars. Because the method of adding the tissue IS identical on each of the stars i will use one of the largest stars to show to the process. It will make it easier to see because of the poor lighting here.
I some how lost the video footage of how to attach the string to the moon & stars so can not show you this as ALL the stars have been strung & tissued at this time. Since it would be a waste of materials for me to make a new star simply to show the process i will hope you except my apology & the text explination of how to do this?
To attach the string (wire if used) to the moon & stars IS identical in method.
Using a star as a refference: Choose ANY one of the stars points. CAREFULLY using a craft knife CUT DOWN the point to around 1cm or so. A depth YOU are comfortable working with. TIE or wind a knot or clump of wire end in the string/wire. Hold the knotted/clumped end in the cut you just made in the stars point.
Squeeze in enough HOT GLUE to fill the 1cm area covering the knot/wire clump end. BEFORE the hot glue fully cools gently squeeze the cut back together again. HOLD IT for a minute or wrap in a short piece of masking tape. place to one side until TOTALLY COOLED!. DO NOT attempt to lift the star by the string/wire for a few moments or you WILL dislodge the string/wires hold before the hot glue fully cools.

MY three sizes of stars i created. I went with 5 pointed for the large & medium stars but chose a 4 pointed star for the smaller 6. Simply to add some variety in the final grouping when hung.

The cheapest tissues you can find makes the perfect wrinkles. You WILL need to use at least two layers of the x2 ply tissues for best effect however. When i say the cheapest ANY 'none brand name' tissues will be fine.

On larger projects you CAN use whole sheets but for my stars i tore the tissues down to half sheets to reduce overlapping when attached & of course quarter for the smallest stars i made. As with news print strips etc. Some artists prefer to tear ALL paper(s) used. Some cut the strips. The argument being in favour of torn edges smooth down better. For BOTH cases MY methods produce smooth surfaces anyway. When it comes to tissue paper it IS easy to 'lose' the hard edges so tearing tissues is no real issue in any project i find.

Place a single strip at a time on the 'dry' star. Because i am using cheap thin tissues if i wet the project first before placing the tissue any last minute adjustments would risk tearing the tissue & having to replace it. Laying the tissue onto a dry surface gives me a few seconds to peel off & place the first layer of tissue in the right place if need be. Once you have the first layer on the second layer can go as it pleases the mistakes WILL be lost in the final design later. KEEP the brush WET. Brush over the tissue VERY GENTLY. I prefer to go in one direction if possible to control the way the wrinkles form.

This is just the first of 2 layers i will be doing on each star. Already you can see the strong wrinkles forming nicely here.

As you place each single strip of tissue turn the star over & fold the overlapping tissue over the back of each point. TOP...

Then bottom works best for ME but YOU do it how YOU feel more comfortable with.

ALWAYS make sure to get the CENTER of the star definition back by gently 'dabbing' the WET brush around the central area GENTLY. Do not worry too much about the overlapping tissue building up here at this point. The glue then the paint WILL combine to level out the edges.

Do not forget to keep the string out the way when adding the tissue.

ONLY work on one side at a time. Let each side FULLY DRY before doing the reverse side. The tissue WILL tear or be pushed around when still wet. Hang or lay the star on a plastic sheet (carrier bag etc) to dry.
To attach the stars to the moon simply pierce each finger tip with a craft knife creating a small 'cut'. Repeat the knotting or clumped wire end method mentioned above then insert gently into the small cut you made. Inject a small amount of hot glue then lay on a free surface to cool before hanging the project.
I will post pictures of this project once it both finishes drying (the stars) & i can figure out 'where' i can hang the thing. MOST average houses here in the UK only have 8 feet ceilings & medium sized rooms (around 10 square yards). So finding a location to hang it with a full flat wall behind it is 'tricky' at the moment. I WILL get some pictures posted as quickly as i can, i promise.
Friday, 8 January 2010
3D MOON & STARS MOBILE UPDATE
Well the second last stage has NOW been completed as you know from the post below showing the final stages of the moons completion. The actual HOW TO video IS NOW online on YouTube & should be listed in my list of HOW TO video links at the bottom of the blog here shortly. Enjoy.
Wednesday, 6 January 2010
3D MOON & STARS MOBILE PART 5 FINISHING OFF THE MOON
Several people throughout the places i hang out in the paper mache world have asked me to show some of my painting methods or techniques i use. Well this project has now reached the painting stage so this gives me the perfect excuss to show you some of my technqiues. Although this is a paper mache project ALL my painting techniques CAN be used on vertually ANY surface.
So now i have the moon & all the stars built i can can now finish them off by giving them a final layer of tissue paper then paint. In this post i am going to work on the moon first. Unfortunately the following pictures aren't showing up the full extent of the finished paint work but it actually ressembles the surface of the moon as seen either on a clear night when it is close or through a telescope. I am afraid your either going to have to take my word or see for yourself if you do this project the same way i did. For this project i will be using basic house hold indoor paints of the MATT type NOT gloss, silk or vynil types... MATT.


The final layer of paper is 2 layers of x2 ply tissue paper. In ALL cases where i use tissue paper in ALL my projects i find the cheapest you can find is more likely to wrinkle when wet from the glue & give better results. I have been informed that rice paper gives a similar result from a fellow artist but then this blog is based around both recycling as many materials that can be found around the home as possible as well as assuming many artists are on a small budget.. Again in ALL cases where i use tissue paper i use a 50% PVA glue & 50% water soloution to fix the tissue paper unless otherwise stated. On the moon here i covered ALL the project except for the eye's & finger nails.

Now thats all fully dried the painting can begin. I am going to work with just 3 colours here. Black, white & a light shade of grey. Yes i am aware that techincally speaking black & white are NOT true colours. To begin i need to lay down the base colours so i am going to begin with the black & paint on some shadows. You need not be concerned about being 'perfect' here when doing this as during the painting stage i am going to show you how to cycle through 5 stages using these 3 colours to create 5 different 'effects' that will combine & create a perfect looking lunar surface.
Begin where you prefer. I have started around the crators. I painted inside the crators then around them in crude rough & ready strokes with the paint brush being a little dry of paint allowing the black paint to go on heavy & fading as i went.

Around the mouth, under the eyebrows, in 'front' of the knuckles the painting follows the same rule. Put very little black paint on the brush & just let it fade out here & there as you paint. Don't try to make the lines a perfect equally matching size or shape. Just let the brush do the work & the paint flow as it wants from the brush.

Now it is time to abandon the paint brush TOTALLY for some old well used seriously worn out sponges. For best results you want the foam sponges that have little to no holes in the foam. The tightly packed small rectangular foam on one side & plastic wiry type backed types are the BEST for sponge painting. The more worn the better.

Also an odd scrap piece of card. It makes no difference the type of card stock you use, just a piece big enough & thick enough not to fall apart when you dab the paint coated sponge on it a while will do.

Again it is your choice 'where' you start painting. Dip the sponge in your GREY paint FIRST. EVERY TIME you dip the sponge in the paint (all colours) from now on in the painting stage remember to dab it on the card BEFORE you touch your project. As you work you ONLY want small amounts of grey paint on the sponge. Dab GENTLY here & there in a totally RANDOM pattern over the entire moon. You DO NOT want the entire moon painted grey, leave 'some' white tissue showing as you go. Make it blotchy all over. By the time you have done one half of the moon the paint you first put on should be DRY to the touch, that's how thin you want the paint to go on at ALL times.

Like this. I know, i know it looks totally wrong. Trust me these are just our base coats. We are going to work 'up' from this stage to create the perfect lunar surface effect in layers... Trust me.

Now for the first white layer. Remember we are using MATT paints here. Combined with the worn sponges the matt paint will dry to a perfect dusty coating like finish. Again as with the tissues the cheapest water based MATT paints you can find will give the best results. Remember we are painting a 4 billion year old moon even if it is a cartoon version the cheap water based matt paints will give us that ancient lunar look we are trying to create here. Well i am anyway.

Dab on the white in EXACTLY the same way you did the grey RANDOMLY. This time use even LESS paint on the sponge than you did the grey. I know it will not look white as it goes on as the grey WILL show through the even thinner coating of white as you dab where you cross over the grey layer. In area's where you want the white to be stronger simply dab over again a few times until you get the required effect or white look to it. Try to keep the 'extra' white look to a minimum though. Where the white goes over the grey area's leave it as thin as possible of a coating. Try to leave the white & grey sections 'blending in' as much as possible. We have ALL at some point rubbed out pencil marks & been left with a dull grey smudge, try to imagin THAT effect where the white fades into the grey.
THIS IS the look you are going for. A kind of smudged white & grey look with whisps of black smudges showing through in the hollow requions such as around the mouth, crators etc. Already it is begining to look like a lunar surface isn't it? Just 2 more layers of paint & we will have the perfect effect.

NOW to do the unthinkable which may alarm many of you none painter types who have just created the perfect finish so far for the first time in your life. We are going to do a BLACK WASH. In traditional terms this involves painting over a project using a paint brush & very very watery black paint. Then before this dries we would normally wipe the excess OFF. In the grand scheme of things this WOULD be a perfect finishing touch really bringing out ALL the finer details the paints have burried. In THIS case how ever we are going to 'continue' with the sponges & dab on 'selectively' our watery black paint.
I can't give you a precise mix of paint & water ratio here. This WILL vary from artist to artist & project. WHY? Well we each have our own method of painting & our own idea's of what being 'gentle' is. The best description of how you want YOUR black wash to be is an extremely watery black stained water mix. Hmm, imagine you spilled a cup of coffee or tea. THAT kind of watery.
Now when dabbing on the black wash try to concerntrate more on the hollow area's: under the nostrils, under the eye's, around the & inside the crators that type of area. DON'T cover the entire moon, leave the lighter 'smudged' area's alone. You CAN always go back over area's you want darker again.


THIS is the effect your looking for. It will blend all the are's you go over in a dfferent way than the white & grey did before adding back a darker shade to the deeper hollow area's whilst adding a new layer of shading to the lighter shaded area's. Just like the grey & the white remember NOT to cover the whole project. NOW to add the final layer of paint.
When the black wash is FULLY dry. Take your white one last time. This time you want even LESS white paint on the spnge than you did the first time. Remember paint, card then project. THIS TIME WIPE the sponge over the project NOT DAB!. BE SUPER GENTLE how ever. You ONLY want to 'wipe' white paint onto the 'wrinkles' in the lighter area's of the moon. DO NOT wipe over any area's that you want to leave in shadow!.

Get this final layer of paint just right & you will have the PERFECT lunar surface almost as good as the real thing.
In the LAST section of this project i will be finishing off the stars then hanging the whole project. The final stage will be posted here very soon.
P.S. I AM working on the video version of this stage of the project for YouTube right now as you are reading this & it will be posted very soon & added to my list at the bottom of this page soon.
So now i have the moon & all the stars built i can can now finish them off by giving them a final layer of tissue paper then paint. In this post i am going to work on the moon first. Unfortunately the following pictures aren't showing up the full extent of the finished paint work but it actually ressembles the surface of the moon as seen either on a clear night when it is close or through a telescope. I am afraid your either going to have to take my word or see for yourself if you do this project the same way i did. For this project i will be using basic house hold indoor paints of the MATT type NOT gloss, silk or vynil types... MATT.


The final layer of paper is 2 layers of x2 ply tissue paper. In ALL cases where i use tissue paper in ALL my projects i find the cheapest you can find is more likely to wrinkle when wet from the glue & give better results. I have been informed that rice paper gives a similar result from a fellow artist but then this blog is based around both recycling as many materials that can be found around the home as possible as well as assuming many artists are on a small budget.. Again in ALL cases where i use tissue paper i use a 50% PVA glue & 50% water soloution to fix the tissue paper unless otherwise stated. On the moon here i covered ALL the project except for the eye's & finger nails.

Now thats all fully dried the painting can begin. I am going to work with just 3 colours here. Black, white & a light shade of grey. Yes i am aware that techincally speaking black & white are NOT true colours. To begin i need to lay down the base colours so i am going to begin with the black & paint on some shadows. You need not be concerned about being 'perfect' here when doing this as during the painting stage i am going to show you how to cycle through 5 stages using these 3 colours to create 5 different 'effects' that will combine & create a perfect looking lunar surface.
Begin where you prefer. I have started around the crators. I painted inside the crators then around them in crude rough & ready strokes with the paint brush being a little dry of paint allowing the black paint to go on heavy & fading as i went.

Around the mouth, under the eyebrows, in 'front' of the knuckles the painting follows the same rule. Put very little black paint on the brush & just let it fade out here & there as you paint. Don't try to make the lines a perfect equally matching size or shape. Just let the brush do the work & the paint flow as it wants from the brush.

Now it is time to abandon the paint brush TOTALLY for some old well used seriously worn out sponges. For best results you want the foam sponges that have little to no holes in the foam. The tightly packed small rectangular foam on one side & plastic wiry type backed types are the BEST for sponge painting. The more worn the better.

Also an odd scrap piece of card. It makes no difference the type of card stock you use, just a piece big enough & thick enough not to fall apart when you dab the paint coated sponge on it a while will do.

Again it is your choice 'where' you start painting. Dip the sponge in your GREY paint FIRST. EVERY TIME you dip the sponge in the paint (all colours) from now on in the painting stage remember to dab it on the card BEFORE you touch your project. As you work you ONLY want small amounts of grey paint on the sponge. Dab GENTLY here & there in a totally RANDOM pattern over the entire moon. You DO NOT want the entire moon painted grey, leave 'some' white tissue showing as you go. Make it blotchy all over. By the time you have done one half of the moon the paint you first put on should be DRY to the touch, that's how thin you want the paint to go on at ALL times.

Like this. I know, i know it looks totally wrong. Trust me these are just our base coats. We are going to work 'up' from this stage to create the perfect lunar surface effect in layers... Trust me.

Now for the first white layer. Remember we are using MATT paints here. Combined with the worn sponges the matt paint will dry to a perfect dusty coating like finish. Again as with the tissues the cheapest water based MATT paints you can find will give the best results. Remember we are painting a 4 billion year old moon even if it is a cartoon version the cheap water based matt paints will give us that ancient lunar look we are trying to create here. Well i am anyway.

Dab on the white in EXACTLY the same way you did the grey RANDOMLY. This time use even LESS paint on the sponge than you did the grey. I know it will not look white as it goes on as the grey WILL show through the even thinner coating of white as you dab where you cross over the grey layer. In area's where you want the white to be stronger simply dab over again a few times until you get the required effect or white look to it. Try to keep the 'extra' white look to a minimum though. Where the white goes over the grey area's leave it as thin as possible of a coating. Try to leave the white & grey sections 'blending in' as much as possible. We have ALL at some point rubbed out pencil marks & been left with a dull grey smudge, try to imagin THAT effect where the white fades into the grey.

THIS IS the look you are going for. A kind of smudged white & grey look with whisps of black smudges showing through in the hollow requions such as around the mouth, crators etc. Already it is begining to look like a lunar surface isn't it? Just 2 more layers of paint & we will have the perfect effect.

NOW to do the unthinkable which may alarm many of you none painter types who have just created the perfect finish so far for the first time in your life. We are going to do a BLACK WASH. In traditional terms this involves painting over a project using a paint brush & very very watery black paint. Then before this dries we would normally wipe the excess OFF. In the grand scheme of things this WOULD be a perfect finishing touch really bringing out ALL the finer details the paints have burried. In THIS case how ever we are going to 'continue' with the sponges & dab on 'selectively' our watery black paint.
I can't give you a precise mix of paint & water ratio here. This WILL vary from artist to artist & project. WHY? Well we each have our own method of painting & our own idea's of what being 'gentle' is. The best description of how you want YOUR black wash to be is an extremely watery black stained water mix. Hmm, imagine you spilled a cup of coffee or tea. THAT kind of watery.
Now when dabbing on the black wash try to concerntrate more on the hollow area's: under the nostrils, under the eye's, around the & inside the crators that type of area. DON'T cover the entire moon, leave the lighter 'smudged' area's alone. You CAN always go back over area's you want darker again.


THIS is the effect your looking for. It will blend all the are's you go over in a dfferent way than the white & grey did before adding back a darker shade to the deeper hollow area's whilst adding a new layer of shading to the lighter shaded area's. Just like the grey & the white remember NOT to cover the whole project. NOW to add the final layer of paint.
When the black wash is FULLY dry. Take your white one last time. This time you want even LESS white paint on the spnge than you did the first time. Remember paint, card then project. THIS TIME WIPE the sponge over the project NOT DAB!. BE SUPER GENTLE how ever. You ONLY want to 'wipe' white paint onto the 'wrinkles' in the lighter area's of the moon. DO NOT wipe over any area's that you want to leave in shadow!.

Get this final layer of paint just right & you will have the PERFECT lunar surface almost as good as the real thing.
In the LAST section of this project i will be finishing off the stars then hanging the whole project. The final stage will be posted here very soon.
P.S. I AM working on the video version of this stage of the project for YouTube right now as you are reading this & it will be posted very soon & added to my list at the bottom of this page soon.
Sunday, 3 January 2010
A RAMBLING SPACE FILLER OR?...
Hi all well i am officially back from my holiday break. Not much of a break though as i spent the last weeks over the Christmas & new year trying to tidy my small PC/PM room up as it has gotten way too messy & crowded in here lol. I still have some tidying to do yet BUT i have NOW gotten some working space again. Once i have posted this space filler, er!, whats to come over the next few days weeks information post (i think i recovered that well enough lol) i WILL be doing the last section of the 3D moon & stars HOW TO. for the blog here & the YouTube video too. I do appologise for NOT having gotten that done before the Christmas rush hit. It kind of snuck up on me faster than i expected, but then i think a LOT of us may have gotten caught out too?
I WILL how ever be going back to my mermaid & dolphin water feature too right after the 3D moon project. As i just said space was not something i had to spare lol.
Whats to come after that then. Well i want to get the many unfinished projects i have started finished. Many don't or won't appear here for several reasons which i won't go into right now. I WILL be making up for that how ever with several NEW projects designed specifically for the blog here though. I want to show some of the techniques i use in creating large 'hollow' forms & do more on balloon based armatures too. As well as balloons i use many many 'other items' large & small to create hollow armatures (my large ornimental dishes for instance). I want to show HOW the SAME items can create one thing & still be used to create others too. I know that sounds a little vague but it WILL become clear later. Of course i have LOT'S of finished projects awaiting paint. Ah painting the job i love to hate lol.
I have several projects awaiting paint & i HAVE had some people asking to see 'more' of my painting methods. So that WILL definately kill two birds with one stone so to speak. No birds will actually be hurt during the painting posts of course. Since catapults (sling shots) are now ilegal here & i couldn't pull one back now to save my life i couldn't shoot a bird staionary or certainly not in flight lol.
Right just wanted to get that off my chest before i got to video'ing & then editing still images & video. I didn't want people to think my blog had run dry or begun to stagnate in any way... I am rambling again aren't i?
Lol ah, it's good to be back. Stay tuned folks...
Friday, 1 January 2010
LEAVING MACHE PROJECTS HIGH & DRY
I just got reminded that there is something i have been intending to make for sometime now. NOT something paper mache per say, BUT!, definately something to speed up drying of most any paper mache projects. Radiator drying IS the fasted method for drying any PM project be it based around strips or pulps. How ever it WILL increase warping on many projects that are not spherical or box like shape. Balloon based armatures which a lot of my projects are based around is even trickier in terms of expansion mishaping & bursting during radiator drying even when taking care & monitoring them. So whilst being extremely effective in terms of drying times it is not always then 'the ultimate' effective method in drying.
Hot, warm or even cold air passing constantly over 'anything wet' IS a fast drying method with out any doubt (thats why we put washing on a clothes line outside). How ever being able to force air over a project in a constant controlled manor isn't always so simple. Yes you can stand any project any size in front of a large fan or two fans even but a LOT of fast moving air IS going to miss the project & reduce drying times quite a bit even if you don't realise this. Of course space to use more than one fan can be an issue to many people (myself expecially). The obvious & simplest answer to this problem is then a 'drying chamber' the design for which i have in mind IS extremely cheap, easy to make & requires NO real techincal skills in inovation or creation to speak of.
The most exspencive item for the drying chamber will be the fan fixed or oscilating types, but the largest you can afford will be more efficiant. I say i have been meaning to make this for some time now, for some reason i can't explain i keep forgetting to purchase a large fan to dedicate to this project. Since i only go art supply shopping once a month (every 4 weeks) your going to have to be patient with me on this one & wait another 2/3 weeks before i can get what i require (er!, a large fan lol). I WILL how ever show you how to make the drying chamber once i have all the required fan lol.
The design for the drying chamber i have in mind will not only be simple to make (trust me on this) but WILL also have nothing but benifits which include: easy setup/storage, easy access when inserting projects to dry & check if dry. Will take up ONLY space according to the height & a fraction wider thean the dimensions of the fan head (the blades & covering cage). The design is such it can be placed almost anywhere in the house, shed or art room where there is space to stand ANY large fan!.
So just thought i would throw this into the mix to get the ball or blog rolling a bit more on this first day of 2010 & my official return back to activity on the internet lol. Remember this project WILL increase drying times ten fold be it strip or any mix of pulp based project, IS very VERY simple to make & requires little to NO technical skills. You WILL even be able to 'alter' my initial design to take larger projects at no real extra cost too but more on this in a couple of weeks. I want to get back to unfinished projects i have going on my blog for the present time.
GOOD MORNING 2010
Well 2010 is finally here. I hope no one got too drunk during the celebrations & is starting the new year in a grumpy mood lol. A tradition of mine i like to keep up is to greet the new era all by myself at the front door. So no matter what the year may bring i will always have that first impression of the new year un-impared in any way as the grumpy world wakes & spoils it.
So after a very late night & an equally late morning start i finally tore myself out from my warm paper mache dream filled bed, stumbled along the landing to an equally warm toasty (if wet) shower. The warm innards of DARKSIDE HQ meant i didn't get fully dressed or fully awake, even after the shower. So i did not bother to ask my wife B (Barbara) to help me put on a T shirt (my dissabilities mean i need help in many basic ways).
So i finally made my way down the stairs to go greet the new era at the front door... As i swung the front door open you have to try to imagine the sound of an old stylus (needle) being scratched across an equally old vynil record (pre-CD for you youngsters). That cartoon comical sound that is used to indicate shock as someone/thing is renched into a sudden & urgeant halt. I stood there bursting with lovely warmth at my back to have a wall of freezing cold at my exposed front. Instead of slamming the front door shut before any bits fell off from the cold i dug out my mobile & took a shot of the view for those of you who love the snow lol.

OUTSIDE THE FRONT DOOR.

OUTSIDE THE BACK DOOR.
Luckily it is always nice & toasty warm inside DARKSIDE HQ no matter the weather. So once i get my last bit of tidying up done (been tidying up my PM/PC room since before Christams lol) I shall get right back to PM'ing immediately, in the next day or so lol.
I have many old projects i want to get finished including those i have/am sharing with you on this blog. More importantly i have many many more to begin & share too. So here is hoping you will enjoy a great new year & the snow if not the cold lol.
Subscribe to:
Posts (Atom)